Paper: "A proper motion study of the Lupus clouds using VO tools" (López Martí, Jiménez-Esteban, Solano 2011 A&A 529, 108)
# Step1: Data discovery in the VO
- Launch TOPCAT (Download the "topcat-full.jar" file and execute it from a terminal using "java -jar topcat-full.jar")
- VO / Vizier Catalogue
- Click "All Rows" radio button
- Select "By Keyword" tab in Catalogue Selection panel at bottom
- Keywords "Lopez Marti Lupus"
- Click "Search Catalogues"
- Select "Lopex Marti+" entry in returned result and hit OK. This will load three tables (groupA, groupB and table6) in one go.
# Step2: Assesment of proper motion catalogues
- Concatenation of tables
- TOPCAT main window / Joins / Concatenate Tables
- Base Table: 1: Cone-180d (the "group A" table)
- Appended Table: 2: Cone-180d (the "group B" table)
- Click "Concatenate". A new table (3: concat(1+2)) with 179 rows will be created.
- Let's have a look at the new table: TOPCAT main window / Views / Table data
- Column selection
- Remove all columns but RAJ2000, DEJ2000 from table #3
- TOPCAT main window / Views /Column info
- In the "Table Columns" window --> Columns / Hide all columns. Tick "RAJ2000 (column ID $16)" and "DEJ2000 (colum ID $17)"
- Let's look for counterparts in three proper motion catalogues: PPMX, SuperCOSMOS and UCAC3
- PPMX
- TOPCAT main window / VO / Multicone --> Keywords: PPMX --> Submit query
- Click on "I/312"
- Input Table 3:concat(1+2)
- Click "Go" --> A new table "4:cones(3)" with 41 rows is created.
- TOPCAT main window / Label: --> write PPMX
- SuperCOSMOS
- TOPCAT main window / VO / Multicone --> Keywords: Supercosmos --> Submit query
- Click on "SuperCOSMOS Science Archive (SSA)"
- Description --> Click on "Source table: "
- Input Table 3:concat(1+2)
- Click "Go" --> A new table "5:cones(3)" with 135 rows is created.
- TOPCAT main window / Label --> write SuperCOSMOS
- UCAC3
- TOPCAT main window / VO / Multicone --> Keywords: UCAC3
- In the column "Short Name", click on "ucac3"
- Input Table 3:concat(1+2)
- Click "Go" --> A new table 6:cones(3)" with 142 rows is created.
- TOPCAT main window / Label --> write UCAC3
- The number of counterparts in the PPMX catalogue is very small --> Discarded
- Supercosmos and UCAC3 provide a similar number of counterparts. Let's have a look at the associated errors:
- Cross-match: Identification of sources with counterparts in Supercosmos and UCAC3
- TOPCAT main window / Joins / Pair match
- Table1:
- Table2:
- Click "Go" --> A new table (7:match(5,6)) with 115 rows is created.
- Let's create a couple of new columns in this new table:
- TOPCAT main window / Views / Column Info
- In the "Table columns" window --> Columns / New synthetic column
- In the "Define Synthetic Column" window -->
- Name: er_pm_supercosmos
- Expression: sqrt(sigMuAcosD*sigMuAcosD+sigMuD*sigMuD)
- Again, in the "Table columns" window --> Columns / new synthetic column
- In the "Define Synthetic Column" window -->
- Name: er_pm_ucac3
- Expression: sqrt(e_pmra*e_pmra+e_pmde*e_pmde)
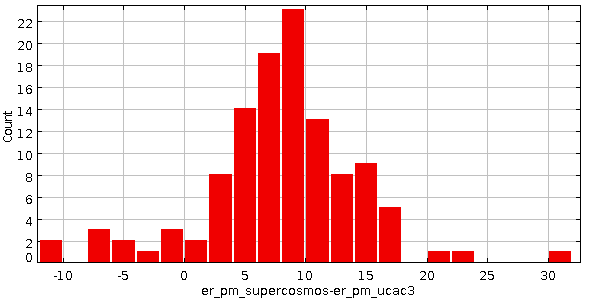
- Let's compare the proper motion errors in superCOSMOS and UCAC3 in a histogram:
- TOPCAT main window / Graphics / Histogram
- XAxis: er_pm_supercosmos-er_pm_ucac3
- We see how the errors in superCOSMOS are greater than in UCAC3 (figure 1). Therefore, we decide to use UCAC3 as the source for proper motions.

Figure 1
# Step3: Proper motion study
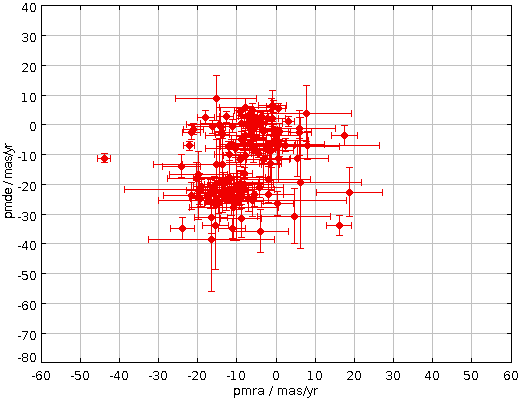
- Let's see now how our objects are displayed in a vector point diagram
- TOPCAT main window --> Click on 6:cones(3) (the UCAC3 table)
- TOPCAT main window: Graphics / Plot
- X Axis: pmra
- Y Axis: pmde
- Let's draw now the error bars
- In the "Scatter Plot" window:
- Errors / X Symmetric --> Write "e_pmra" in the new box
- Errors / Y Symmetric --> Write "e_pmde" in the new box
- Let's change the scale in the X,Y axis
- In the "Scatter Plot" window: Plot / configure Axes and Title
- In the "Axis Configuration window"
- X axis / Range: -60, 60
- Y axis / Range: -80,40
- Click "Apply"

Figure 2.
- Two groups can be clearly seen in the vector point diagram (figure 2). The first group ("group A", our table 1:Cone-180d) is formed by sources with higher proper motions, where the mean value is around 28 mas/yr. The objects belonging to the second group ("group B", our table 2:Cone-180d) have lower proper motions, with a mean close to 8 mas/yr.
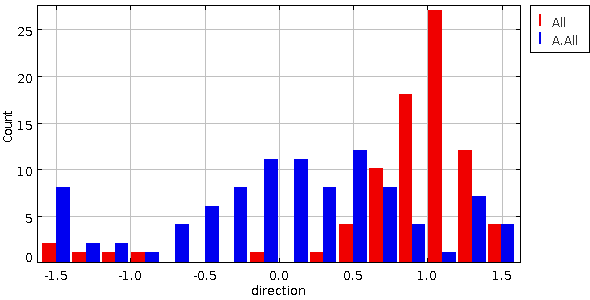
- Let's study now the displacement direction for Group A and Group B sources.
- TOPCAT main window / click on 1:Cone-180d
- Create a new column. Name: direction. Expression: atan2(pmde/pmra)
- TOPCAT main window / click on 2:Cone-180d
- Create a new column. Name: direction. Expression: atan2(pmde/pmra)
- TOPCAT main window: Graphics / Histogram / Table: 1:Cone-180d / X Axis: direction
- Click on the "+" symbol ("Add a new data set") / Table: 2:Cone-180d / X Axis: direction
We see (figure 3) how most of the "group A" sources (red histogram) have similar proper motion directions suggesting a common origin. The "group B" sources (blue histogram), on the other hand, exhibit a variety of values. This suggests the group B may be formed by populations from various origins.
The two conclusions obtained in this study (lower proper motions and different proper motion directions) together with others described in the paper (most of the spectroscopically confirmed sources belong to group A, lack of sources with disks in group B, optical and near-IR colours) strongly suggest that group B represent a population (or mixture of populations) probably unrelated to the star forming region. Group A, on the other hand, has properties consistent with what is expected from a genuine population of Lupus.

Figure 3.
# Step4: Determination of physical parameters using VOSA (http://svo2.cab.inta-csic.es/theory/vosa/)
- Let's create the VOSA input file from the 1:Cone-180d table. VOSA expects an input file whose first four columns are: object id, RA (deg), DEC (deg) and dist (pc).
- RA, DEC in table 1:Cone-180d (columns $16, $17 are given in hh:mm:ss and dd:mm:ss, respectively). We have to create two new columns with RA, DEC in degrees.
- In TOPCAT main window --> Views/Column Info
- In Table Columns window --> Columns / New synthetic column
- In Define synthetic column
- Name: RAdeg
- Expression: hmsToRadians($16)*180/PI
- In Table columns window --> Columns / New synthetic column
- In Define synthetic column
- Name: Decdeg
- Expression: dmsToRadians($17)*180/PI
- Let's also create and object_id column with the table index
- In Table columns window --> Columns / New synthetic column
- In Define synthetic column
- Name: Obj_id
- Expression: $0
- Let's create a new column with the distance to the Lupus clouds (d:200 pc)
- In Table columns window --> Columns / New synthetic column
- In Define synthetic column
- Name: dist
- Expression: 200.
- Units: pc
- Let's hide all columns but obj_id,RAdeg,Decdeg and dist
- In Table columns window --> Columns / Hide all columns
- Tick in the column "visible" obj_id,RAdeg,Decdeg and dist
- The columns should be ordered as: obj_id, RAdeg, Decdeg, dist
- In TOPCAT main window --> Views / Table data
- In Table browser window --> If necessary, click on the column name and drag.
- Let's select rows #7,35,43,67
- In TOPCAT main window --> Views / Table data
- In Table browser window --> Click on row #5, keep pressed key "ctrl" and click on the rest of the rows.
- In Table browser window --> Subset / Subset from selected rows.
- In the New Subset window --> New Subset name: Subset
- Click "Add Subset"
- In TOPCAT main window --> Row subset: subset
- Let's save the table with the selected columns and rows in ASCII format.
- In TOPCAT main window --> Files /Save Table(s) or session / Filestore browser / output format: ascii.--> vosa_input.txt
- In VOSA
- Let's go to VOSA server: http://svo2.cab.inta-csic.es/theory/vosa/
- First you have to register: Click "register" and follow the instructions
- Click "Stars and brown dwarfs"
- Upload the file vosa_input.txt. Description: whatever ("first_attempt_with_VOSA, for instance).
- Click "upload"
- You will see the message "vosa_input.txt has been succesfully uploaded!" --> Click "continue"
- Click "VO Phot.". To save time, click "unmark ll" and select just the following services: 2MASS, DENIS and WISE --> Click "Query selected services"
- VOSA will return the photometry found in these services --> Click "Save VO photometry". Using the information available at the SVO Filter Profile Service (http://svo.cab.inta-csic.es/theory/fps3/index.php?mode=browse), the magnitudes are converted to fluxes.
- Click the "SED" tag, to visually inspect the observed SEDs and remove bad points.
- Object #35 --> Tick "delete" WISE W4 --> Click "Apply changes"
- Object #43 --> Apply infrared excess from "WISE W2 --> Click "change excess"
- Click the "Chi-2 Fit" to perform the model fit.
- Click "unmark all" and select only "Kurucz" and "BT-Settl" grid of models
- Click "Next: Select model params"
- Use Kurucz for Teff > 4500K and BT-Settl for Teff < 4500K
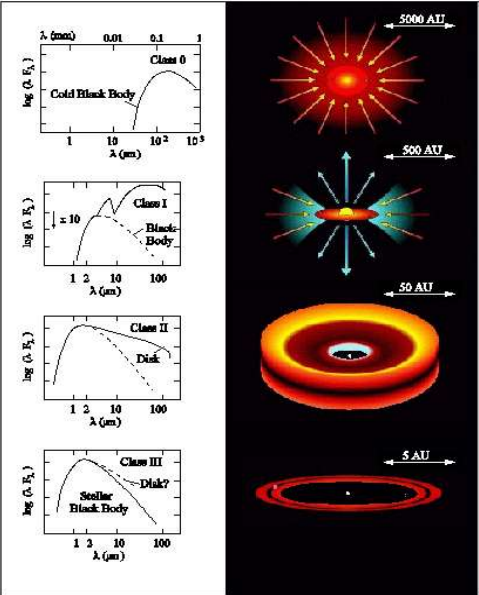
- Click "Next: make the fit" --> VOSA will display a table with the models that best fit. Click "Show graphs" to have a look at them. Fits are good for #35, #67, and #7 (Class III objects in which the energy mainly comes from a central star) but not for #43 (class I objects in which the mid infrared radiation coming from the dust envelope is predominant over the photospheric radiation.)

- Click the "HR Diag." tag to estimate masses and ages
- Click "Make the HR diagram"
- #43 and #67 lie outside the area covered by the isochrones.
- Click the "Save Results" tag to save the results obtained so far.


